The Photostick Unbiased reviews & comparisons, Photostick instantly backs up all photos and videos stored on computers and mobile device.
Do you run out of storage space for your photos and videos sometimes? If you do, you might have considered keeping them in a separate flash drive. Now, flash drives can be kind of expensive and unreliable, and then transferring the files on the drive can be a hassle. You may not even be able to find all the files you are trying to transfer.
The PhotoStick sets itself up as a solution for these kinds of problems. I am going to give you an unbiased review for this product that may help you with your purchasing decision.
What is The PhotoStick?
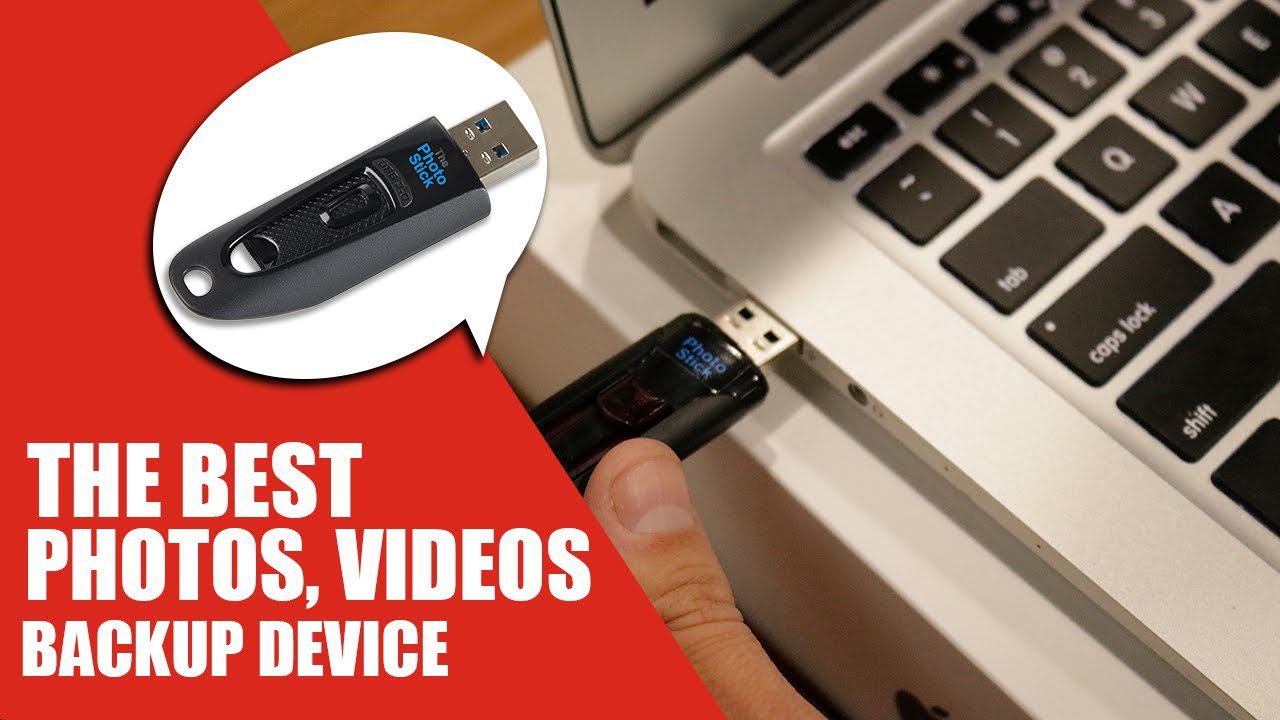
The PhotoStick is a compact and lightweight USB thumb drive designed to backup your photos by finding them through a thorough archive scan. To use ThePhotoStick, no technical know-how is needed. ThePhotoStick is a groundbreaking device designed to back up information in seconds. It looks just like a pen drive.
It contains software that scans over storage for photos you missed. Not only does PhotoStick work on images, but it can also locate photos and video recordings. The Photostick can keep your photos and videos safe and protected in its memory (up to 60,000 of them, and this is a crazy amount).
Features
The Photostick is specially designed to find all the hidden photos and videos on your laptop or computer. Just plug it in and select “Go”. It’ll take about 10-20 minutes to work its magic. It’s going through all of the folders and files in your entire computer to make sure it doesn’t miss a thing. Afterward, it deletes all duplicate files, so you don’t have to delete them yourself.
Hit ‘GO’ & Done: No account setup, no selection of files, and no time wasted sifting through & organizing – just plug it in, click ‘GO’, and go grab a coffee while all your memories are automatically saved & sorted for you!
Fast and automatic: You don’t have to waste precious hours sitting in front of your computer when simply clicking ‘GO’ accomplishes the same thing in a fraction of the time!
Without this smart photo backup, you’d have to sit in front of the computer and manually select which photos you want to keep. Then you’d have to create folders and label them. Using the photo stick is not a lengthy process. It really doesn’t take too much time. You can even perform any other tasks on your computer when the photostick is working. It also has built-in software that is very user-friendly. It is really very easy to use so that anyone can use it without any technical experience.
Easy To Use: You don’t need to be tech-savvy or have software knowledge. Just plug it in, click ‘GO’ and you are done. ANYONE can use it!
Compatible with all the available media formats: Whether it’s JPEG, JPG, PNG, MP3, or GIF the photo stick will save all of your photos and videos.
One-click backup: Unlike backing your files in cloud storage, it doesn’t require setting up an account or installing the software. All you have to do is plug the thumb drive into the port, click the ‘GO’ button, and wait for it to finish backing up. You can even grab a coffee and be productive while waiting.
No Internet Required: If you have no Wi-Fi? It’s not a problem! You can take a back up of your files anywhere and anytime even if you are not connected to the internet. The device is not like any cloud storage service that needs an internet connection to work. You can think of it as a hard drive. It’s just much more portable and is made specially to backup photos and videos.
You don’t have to figure out how to connect to wifi or make sure you have an internet connection…just plug it in and click ‘GO’.
Automatically Filters Out Duplicates: You don’t have to worry about figuring out and manually weeding out duplicates to save valuable space on your PhotoStick, it automatically does it for you.
ONE Convenient Device: You can stick the small PhotoStick thumb drive, with all your family memories, right in your pocket while dealing with a house fire or natural disaster.
Saves Nearly All Image & Movie Formats: No matter how long it’s been, all your photos & videos from years ago will be found and saved – even one you forgot you had! Aside from the MOV, JPG, PNG, and MPEG4, the photo storage stick is compatible with other extensions. These can include the following: GIF, TIFF, PCT, ICO, BMP, AVI, RAW, WMV, and MOV.
What Problems Does The PhotoStick Solve?

People have 1000s of photos and videos saved in an unorganized fashion on one or more computers. If and when someone wants to sort, organize, and save them in one place, it can take hours upon hours to accomplish a massive task. ThePhotoStick finds, downloads, and saves all those photos and videos with one click of a button.
- Safeguards against tech tragedies/disasters
- Easy-to-use
- Physical storage vs. cloud-based
How does it work?
Though it just takes a few minutes for setting up The PhotoStick for the first time, you will find that it takes really less time as you begin feeling more comfortable with the device. We will go over the steps in order to take the first time you use it to show you how easily this gadget works.
- Begin with removing the stick from the box and all other packagings.
- Slip the plastic cap off from the end for revealing the USB piece.
- Insert the USB end in one of the open ports on the computer, turning it over to make sure it fits properly
- You then have to wait for the computer in order to recognize the device
- Click on the open or run button via the pop-up window for giving the device permission to run
- Select the “Go” button via the next window to let the stick perform a search of your computer.
Do not worry if the computer does not recognize the stick. You will then want to select ‘My Computer’ and then check the linked devices. When you double click on the USB icon, you can manually select the device and then load it. You can follow the steps mentioned above in order to let it run. The same steps work for the computers running any version of Windows as well as Mac.
Benefits of The Photostick
- Save time: Instead of spending hours on your entire hard drive or SSD looking for vacation, kids or wedding photos to make a manual backup, you just use the Photo Stick! it allows you to search for photos and videos on your computer in seconds with a single click.
- Save money: Software with which you can organize your photos will cost you 100 Euros or even more. but at the same time, The Photostick USB costs less than half and protect your photos and videos and protect you from illegal access and chances of losing data.
- Protect your personal information: Your computer is always vulnerable from the outside – whether this is due to a virus or hackers. There is a permanent danger that all your personal photos will be lost. This cannot happen with a stick. Because with this your photos are safely stored on an external The Photostick USB and at the same time protected against attacks by hackers or viruses.
- Keep your memories: While your computer can stop at any time or is attacked by a virus and therefore all photos are gone, ThePhotostick ensures the safe storage of your photos and videos. Stored on a Photo stick, you can view and use your children’s and wedding photos and the holiday photos at any time – forever! Because they are permanently stored on ThePhotostick Review stick and stored safely.
Technical Details
- Product Dimensions: 15.19 x 7.9 x 0.99cm; 18.14 Grams
- Hardware platform: PC, Mac
- Hardware Interface: USB
- Batteries Required: No
- Item weight: 18.1 g
For Whom Is The PhotoStick For
This tool is useful to everyone, but it is especially helpful to people who are not very familiar with electronics. If you’ve been dealing with using laptops, iPads, and other tech gadgets in the past, then this software is perfect for you.
Using it should be so quick you will not have any trouble plugging in it and working out how to store or use the files later on. You can plug in the app to any compatible smartphone to access and manage your photos, files, songs, and documents. When you plug in the computer, a window will pop up on most computers. There all the data you have saved on any device can be used and used.
It means you can take details from one device or phone and connect it to another. Its like having your entire computer with you, making it a lifesaver for anyone who has to do research on-the-go or who has to access personal files while traveling.
It’s likewise a perfect commodity for any photography enthusiast. You can store so many pictures here that you can never run out of space completely. No need to think about keeping several devices in place. Just stack it all in one place. You re likely to save money on storage devices and have a much easier time figuring out what you’re looking for when all is in one place.
How quickly does it work?
Did we mention that this is a fast product? It can find files very quickly, and you may be surprised at how effectively and quickly it works, finding thousands of files in a very short period of time.
If you have lots of videos and photos on your computer that you want to save onto a portable device or send to another computer, you might be worried that it would take a while to sort them and transfer them, but that doesn’t have to be the case. You can use The Photostick to find them very quickly and get your files transferred in a flash.
How to use The PhotoStick
Using the ThePhotoStick is one of the most straightforward setups you can have for automated data storage. As long as you have a USB port, you are ready to use it to backup your photos and videos.
In this review, I’ll walk you through the steps to show you how simple it is.
- Computer System Requirements: This plug and play device doesn’t require anything to be installed on your computer, nor does it require anything to be already installed on your computer. Also, you don’t need to have the latest machine and operating systems for it to work.
- If you use Windows, then you can run it on Windows 7, Windows 8, Windows 8.1, and Windows 10. If you are a Mac user, then it works on Mac OS X Version 10.7 and later.
- What’s more, it’s not a drain on processing power or memory, nor do you need an internet connection.
- Extensions Compatible with the Photo Stick: ThePhotoStick is best suited to backing up JPEG and HEIC files. Plus it works on a range of other media formats for many photos and video files. JPEGs are the most common image files, and HEIC is those created by smartphones.
- It also supports different file types including PNG and RAW files such as TIF, CRW, NRW and KDC. RAW files are much larger than JPEG and will fill up storage faster.
- It’s great to see support for all the most common RAW file formats, as well as some of the more obscure ones like ARW.
If you work with Adobe Photoshop, it will even back up PSD and PDD formats too!
Aside from photos, it will also work with MOV and MPEG4 video formats. Either way, it will handle the most common files for pictures a
Like its appearance, the PhotoStick is more like the pen drive, which we use daily at work. And How to use it? It operates just like a pen drive! It is easy to use, as easy as counting 1,2,3…
Follow the steps below if you are using the PhotoStick for your PC:
- Locate the free USB port on your PC.
- Plug the PhotoStick into the USB port.
- Wait for your PC to identify the device, just like how you use the USB flash drive.
- A window pops up with options for File backup, files to restore, files to view, etc.
- Click on the green ‘GO’ button to run the device.
- The built-in app in the PhotoStick will transfer the files from the PC onto the PhotoStick. Now you have the backup of your files in the PhotoStick!
Yes, it is that easy to take backup on your PhotoStick. It automatically scans your computer to find all those files with video or image extensions and formats and copies those files to create the backup. It typically takes around 60 seconds to finish scanning. The added advantage of this device is that it removes the duplicate files. You don’t need to manually search and sort the already copied files.
Advantages and Disadvantages
How does The Photostick Organize your Photos?
Photostick is no ordinary flash drive. It looks similar but plays a much better role in saving space as well as automatic organization. Photostick devices use a simple to use software that installs itself after your due permissions.
By simply clicking the ‘Go’ button after the installation is finished, the inbuilt software automatically scans your folders to any photos it can find and starts saving them to the devices’ memory.
Photostick has exceptional abilities to organize all the photos it saves. By using a simple yet effective method, the software even gets rid of duplicates for you. Totally cutting out the manual work of searching for and organizing photos yourself, Photostick does it for you, in a matter of minutes.
Does This PhotoStick Delete Duplicates?
Yes, we can conclude that Photo Stick does delete duplicate images. Your Photo Stick device can be free of duplicate images with two software options: The Native Functionality and PictureEcho. Both of them are very useful as they easily delete duplication.
However, the Native Functionality method is limited because it removes only the oldest versions of images. On the other hand, PictureEcho software can remove any images as per your choice. You can choose between both of the software according to your requirement and convenience.
If you are still confused, please follow this – Does Photostick delete duplicates?
What Files Can The PhotoStick Find?
The PhotoStick can locate any photos, videos, documents and audio files saved on your hard drive and create backups of the same. ThePhotoStick will recursively search any directory paths specified in its settings. By default, ThePhotoStick will start at “c:\” on Windows computers and “/Users” on Mac computers.
The PhotoStick can find and save many types of photo files. By default, The PhotoStick will find and save JPEG and HEIC photo files, but you can select as many photo file types as you want for The PhotoStick to find and save.
When it comes to video files, The PhotoStick will find and save MOV & MPEG4 files by default. To add additional video file types, select as many video file types you would like The PhotoStick to find and save.
As far as documents are concerned, The PhotoStick will find and save Microsoft Word, Excel, PowerPoint, and Works files by default, but it can find and save many more document file types if you choose.
When it comes to audio files, The PhotoStick can find and save MP3, MPEG4, and Advanced Audio Coding audio files by default, but it can find and save other audio file types as well if you choose.
Reasons Why You Should Get This Photo Backup Device
- Easy to use
- Saves precious photos
- Free Memory
- Use it on the go
- Good Value For The Money
- Good Software
- No Cloud
- Secure
- Protect Against HDD Failure
- No Passwords
- Works Offline
- Works On All Devices
Buying a Photostick was one of the best choices we have made. However, we also made sure that our little stick is placed in a safe place. Considering its size, it will be pretty easy to lose it.
There are other alternatives such as picture keeper or having a normal flash drive. Whatever you choose is up to you. But, if you are looking for the most convenient way to safe your photos then the photo stick should be your first choice. You can also use Google Photos if you do not want to buy this tool.
There are other options for photo backup as well. You can upload your photos on Facebook or even use Amazon Prime. It allows people to store the unlimited number of photos. There are also services like Dropbox and Google Drive. However, we can not guarantee about the safety of putting your photos in any cloud service. This is why we recommend storing your photos offline.
The PhotoStick Size Variations
Save 3,500 photos & videos!
Save 30,000 photos & videos!
Save 60,000 photos & videos!
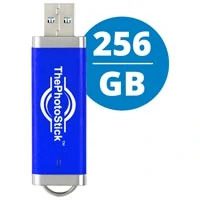
Save 120,000 photos & videos!
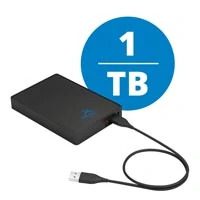
Save More Than 240,000 photos & videos!
Photostick has variety of size options which makes it even more amazing. Let’s discuss the size variations and how much photos, videos it could save.
- 8GB: 3500 photos & videos
- 64GB: 30,000 photos & videos
- 128GB: 60,000 photos & videos
- 256GB: 120,000 photos and videos
- 1TB: More than 240,000 photos & videos
You can select the variant according to your requirement.
How Many Photos Does It Store?
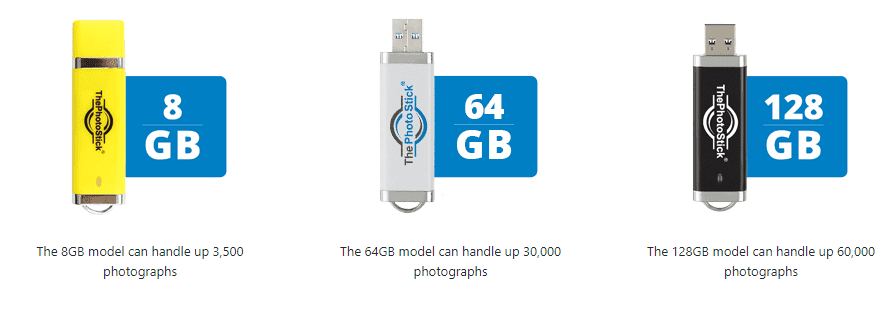
You can use the Photostick to store anywhere from 3,500-60,000 photos at once, depending on which size you get. There are three different versions of the Photostick for computers, and the smallest one is just 8GB and holds only 3,500 photos. Still, that will be plenty of photo storage for the average person, but if you want to store more at once, there are some other options that will accommodate you.
The next size up is the 64Gb one, which holds an impressive 30,000 photos at once. Then, you can upgrade from there and go with the 128Gb one, which will hold about 60,000 photos inside of it.
What Image & Video Formats Does The PhotoStick Support?
The Photostick is compatible with almost all photo and video file types. We tried to backup all the photo and video file types mentioned below and we didn’t face any issue during the process.
| IMAGE FILE FORMATS | VIDEO FILE FORMATS |
|---|---|
| PNG– Portable Network Graphics | MP4 – MPEG Layer 4 |
| JPEG (or JPG)– Joint Photographic Experts Group | MPEG – Moving Picture Experts Group |
| GIF– Graphics Interchange Format | WMV – Windows Media Video |
| TIFF – Tagged Image File | FLV – Flash Video |
| PSD – Photoshop Document | AVI – Audio Video Interleave |
| PDF – Portable Document Format | ASF – Advanced Systems Format |
| EPS – Encapsulated Postscript | DivX – Digital Video Express (DivX-encoded Movie) |
| AI – Adobe Illustrator Document | |
| INDD – Adobe Indesign Document | |
| RAW – Raw Image Formats |
What Are the Other Extensions Compatible?
Aside from the MOV, JPG, PNG, and MPEG4, Photo Stick is compatible with other extensions. These can include the following: GIF, TIFF, PCT, ICO, BMP, AVI, RAW, WMV, and MOV.
The Photostick System Requirements
This plug and play device doesn’t require anything to be installed on your computer, nor does it require anything to be already installed on your computer. Also, you don’t need to have the latest machine and operating systems for it to work. ThePhotoStick works on the following Operating Systems:
Windows: XP, Vista, 7, 8, 8.1, and 10.
Mac: Mac OS X Version 10.7 and later.
Does We Need to Install Anything on Your Device?
While the Photostick is a powerful tool that uses some interesting software for its function, it doesn’t need to download any of that software onto your computer or other device. Everything needed for the Photostick to work is already on the device, and it doesn’t require a download or even an internet connection to work.
You don’t need to worry that harmful files will need to be downloaded onto your computer or that the PhotoStick will need some extra space to work. It clears up space for you and helps to transfer files over so that you have more room, never leaving behind any software on the computer for you.
How to Run The Photostick?
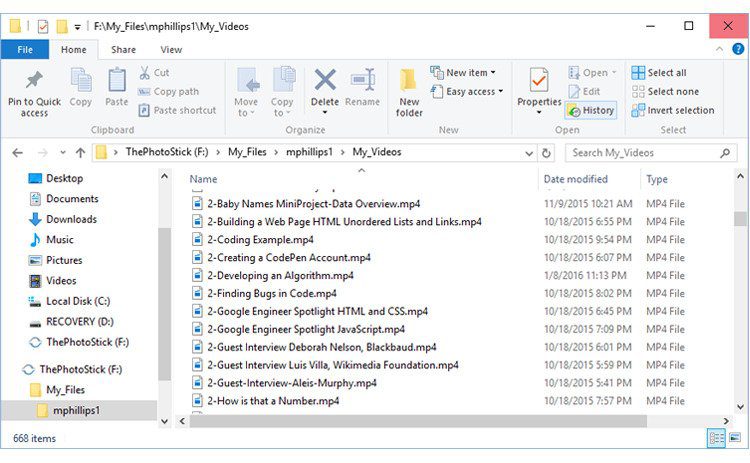
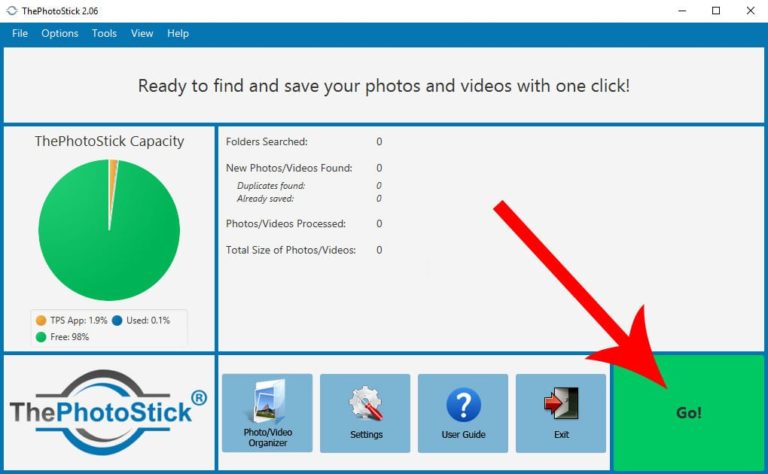
Before we start using the Photostick let’s first see how the user interface looks so we can get an understanding on how to run it.
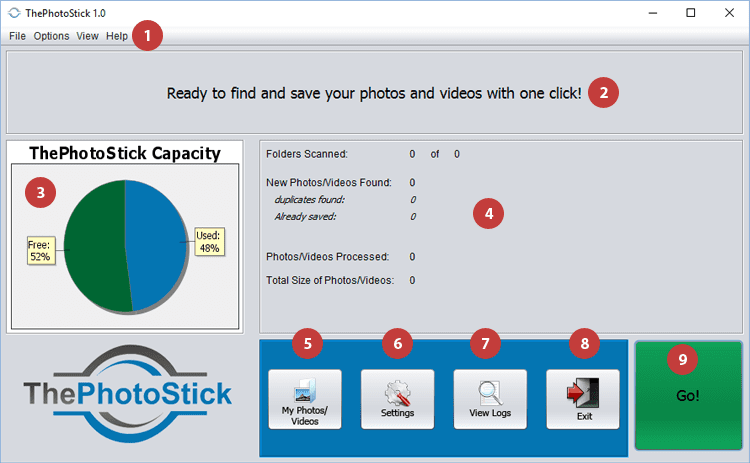
- Main Menu: This menu toolbar allows you to have access to different features of photostick and some of them include images/videos, tools, settings and updates regarding the software.
- Status Area: Whenever You Run Backup then this area will tell you the current status of program.
- ThePhotoStick Capacity Chart: This little chart will tell you how much space you have used and how much there is available on ThePhotoStick.
- Backup Statistics: All kinds of information about your current backup.
- “Photo/Video Organizer” Button: This button will open up a window that shows all your currently backed images and videos.
- “Settings” button: This opens up the options and settings windows for the program.
- “User Guide” button: This will show you the online user guide.
- “Exit” button: As the name suggests, this button will close the program.
- “Go!” button: And finally, the most important button, this starts the backup of all your photos and videos on your PC or Mac.
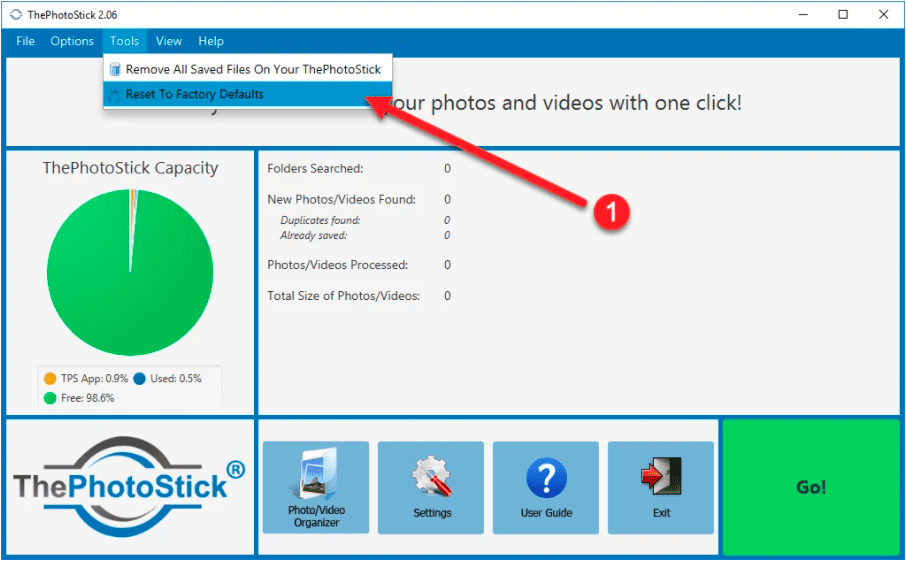
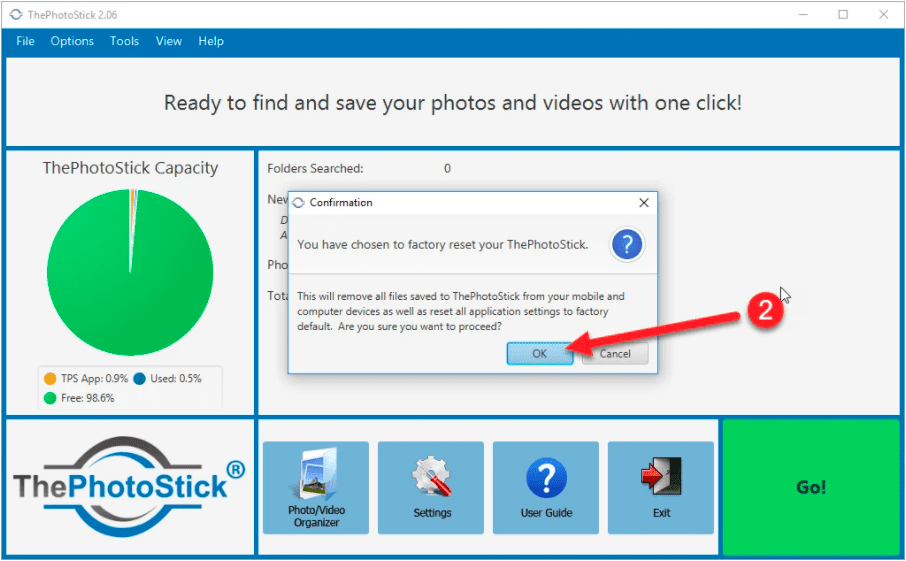
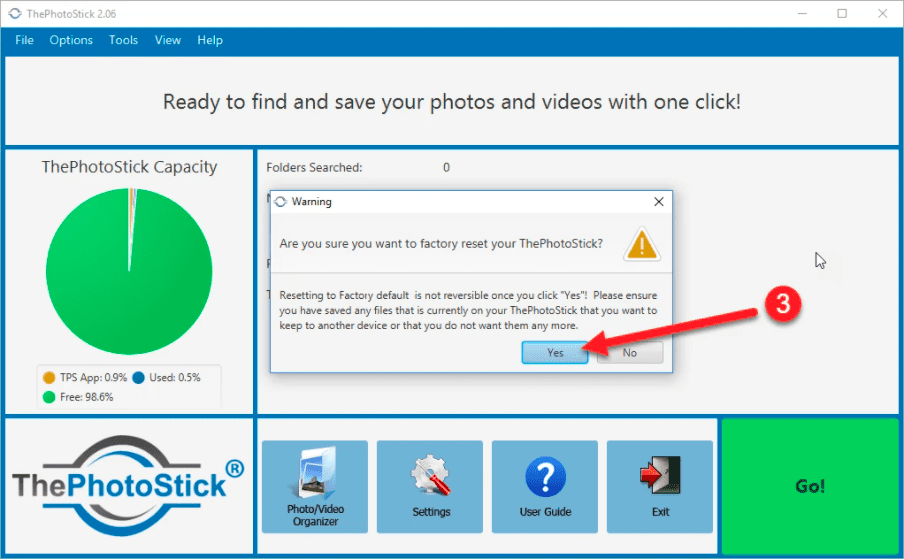
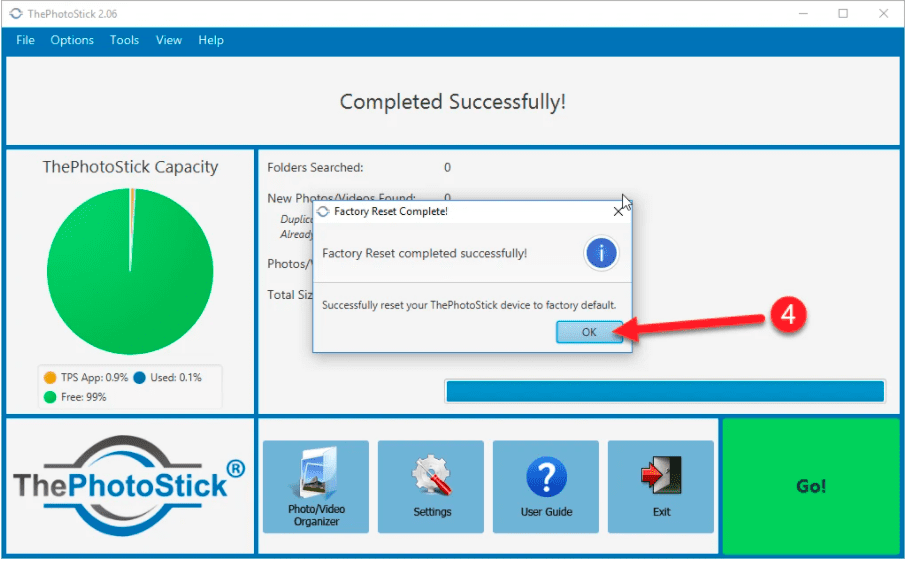
Reset to Factory Defaults
Running the “Reset To Factory Defaults” tool does the following on your ThePhotoStick device:
- Cut of any thumbnail files
- Deletes the My_Files directory and all subfolders and files in My_Files
- Deletes the ThePhotoStick directory and all subfolders and files in ThePhotoStick
- Any application settings changes you made will be lost and replaced with the factory default settings.
NOTE: This tool will NEVER delete any files stored on your computer’s HDDs. It will only remove files from your ThePhotoStick USB device.
How to Remove All Saved Files on your device?
Running the “Remove All Saved Files On Your ThePhotoStick” tool does the following on your ThePhotoStick device:
- Removes any thumbnail files
- Remove the My_Files directory and all subfolders and files in My_Files
- Deletes the ThePhotoStick directory and all subfolders and files in ThePhotoStick
- Any application settings changes you made will remain.
NOTE: This tool will NEVER delete any files stored on your computer’s HDDs. It will only remove files from your ThePhotoStick USB device.
How To Start The Photostick on Windows?
- Insert Your Photo Stick inside any open USB slot.
- Find the USB inside File Explorer and open ThePhotoStick_Windows.exe.
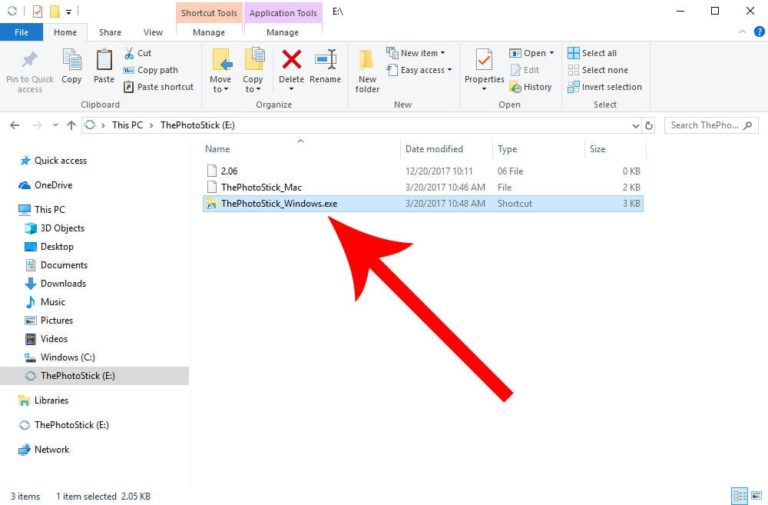
3. When the program loads in, simply click “Go”.
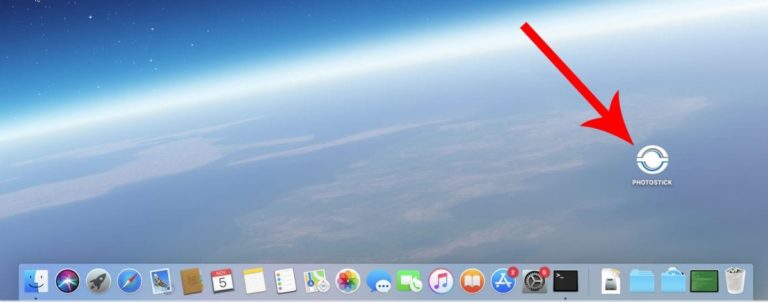
How To Start Photostick on Mac?
- Find an empty USB slot and plug ThePhotoStick in.
- Search for an icon on your desktop by the name of PHOTOSTICK (if by any chance the icon does not appear, you should then go to Finder and open it from the list of devices)
3. Open the file called ThePhotoStick_Mac.
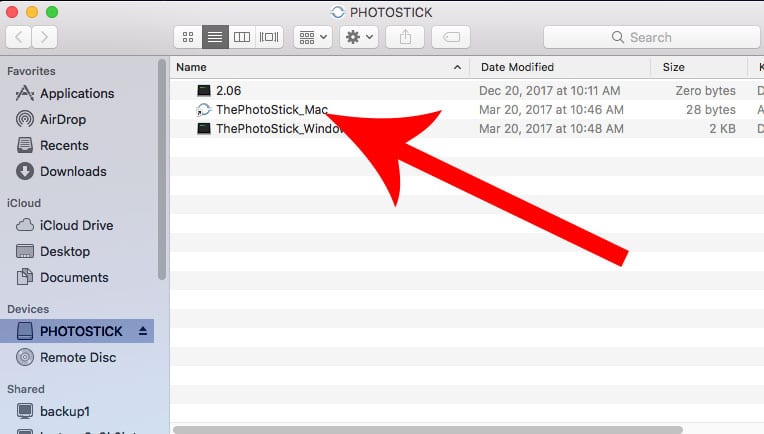
4. After the program loads up simply click the button “Go”.
PhotoStick Troubleshooting
If you wish to restore PhotoStick to factory settings, then you may use the Windows restore tool:
- Download the PhotoStick Restore Tool
- Plug your Photo Backup Stick into your Windows computer
- Run the pbs-restore.exe app and click the “Recover” button.
- If your Photo Backup Stick is not detected, please contact our support team.
To read complete guide on PhotoStick Troubleshooting – Click Here.
Pros and Cons
The Photostick Alternative
Generally, we want to keep our memory forever. The best choice to preserve one’s memory is to keep a backup of those files. If you are thinking about buying a flash drive to keep your memory from The Photostick and InfinitiKloud, you have taken a good course of action.
Flash Drive: It’s nothing but a compact data storage device that is micro portable and lightweight in a simple word. Flash drives connect to other devices via a USB Type-A port. Besides, people also consider it as a jump drive or a thumb drive.
It can contain all types of data files, including pictures, videos, docs files, and bootable media. Flash drives can be written and rewritten an unlimited number of times without any trouble. Flash drives do not require any monthly subscription fees, and it does not need the internet to use.
InfinitiKloud: InfinitiKloud is available at different e-commerce websites and online platforms. You can buy it from many sources with varying capacities of storage. This gadget provides a large variety of capacity options for you, from low to high.
I would like to recommend you to buy this InfinitiKloud data storage from their official website because you will get better service than any other platforms. You’ll get a 30-days money refund policy from the manufacturer.
iFlash Drive: It is a comparably new product in the market. As we know you can’t expand the space on iPhone and IOS devices. But storage is limited and sometimes it’s less than you need. That’s why iFlash is specially for iPhone users. And Some USB drives are a little technical to use on MAC Computers.
iFlash Drive is very convenient with a MAC. It doesn’t need any special allowance to work on MAC. Now you can buy it from any store only dedicated to selling Apple Products. Or you can visit iFlash Drive official website to know more.
MemorySafeX: MemorySafeX is your solution for secure storage when it comes to your cherished memories or desirable files. MemorySafeX is a heavy memory stick capable of transmitting media from your computer, tablets and smartphone. When you update your computer or tablet, you don’t have to fear about messing up your photos and files.
Is The PhotoStick a Good Purchase?
If you go searching for photo storage options online, you are going to see a lot of options. The Photostick isn’t the only choice you have, so you want to make sure you choose the right one for your needs. Is it worth buying the Photostick, or should you choose something else?
I consider this product to be a good value because the price is low and affordable for most people, and the Photostick works very well. It is compatible with the majority of operating systems, computers, and files, which means it works well in most instances.
Photostick does things that other file storage options do not. Most flash drives are not going to find your files for you or eliminate duplicates in the transferring process. Most of them simply hold photos that you manually send over to them, but Photostick does plenty of the work for you to minimize your input and keep things simple, streamlined, and fast for you.
It’s a good buy because it is a safe way to store your photos. If you keep photos on a computer, you might think they are safe there, but a single power outage could render them unusable. Not so with the Photostick, which can securely store all of your files, keeping it protected from power surges and power outages as well as from computer viruses and hackers.
A major alternative to the Photostick is cloud storage, which is really popular these days but compared to the photostick, it doesn’t seem like a very safe choice. The Photostick is a lot safer from hackers, and data loss than the cloud is for storage, so your photos and precious memories will be more secure on a Photostick than they would be kept stored up in a cloud.
Founder’s Story
The PhotoStick was created by Mark Oman, a former VP & GM of Hewlett Packard. He realized that since computers crash more frequently than we like, people run the risk of losing all their photos & videos.
When it happened to him, he looked for a way to quickly and easily backup all his photos & videos so that he would never have to worry about it happening to him again.Unfortunately, there was no such device. And thus, ThePhotoStick was born
The PhotoStick Review
The Photostick is popular enough that you can find tons of reviews for it online. These aren’t just reviews from industry professionals like myself. A lot of consumers who have tried the product have written reviews as well, and these are a valuable resource to tell you if the product is good or not, and if it is worth your money.
The good reviews call out the advantages that Photostick has over the competition, like its ability to find files for the user. People love how it is super easy to start up, too, working as soon as it is plugged into the computer. It starts right away and does a lot of the work on its own, and consumers are raving about how it saves them so much time. They no longer have to find and sort files for themselves. Some consumers are commenting on how they were able to transfer files they thought were lost to them forever, all because the PhotoStick found those for them.
The negative Photo Stick reviews talk about how the device doesn’t work on their computer or how it doesn’t transfer all the files and leaves some behind. These kinds of problems can occur if the photostick isn’t used with the proper device that it is designed to be compatible with or if it isn’t set to find the right kind of files.
People are also having issues with a Photo Stick scam that looks like an authentic product but is not. In order to avoid buying the wrong product, consumers should buy from trusted sources or from the manufacturer directly. This ensures they get a product that works like it is supposed to.
How much does it cost?
By now, you’re probably wondering how much you’ll need to spend to buy The Photo Stick. As we mentioned earlier, The Photo Stick comes in small, medium, and large sizes. Here’s how the pricing breaks down:
- Small version of The Photo Stick, which has 8 GB of storage and can store up to 3,500 photographs, costs $34.99. You can avail up to 30% discount.
- Medium version of The Photo Stick, which has 64 GB of storage and can store up to 30,000 photographs, costs $49.99. That’s 40% off the original price.
- Large version of The Photo Stick, which has 128 GB of storage and can store up to 60,000 photographs, costs $79.99. That’s 50% off the original price.
It’s also worth noting that The Photo Stick comes with a 30-day, money-back guarantee. The guarantee begins on the shipping date. If you order The Photo Stick and it doesn’t work to your expectations, you can simply return it for a full refund.
Photostick Reviews Consumer Reports
“This thing is amazing! Plugged it into my iMac and it found all my pics and saved them. 85,000+ pics saved! Saved storage space on my computer and now I have all of these memories over the past decade saved in a safe place.” – Tenny S.
“I had a grand total of about 60,000 images, with many duplicates. This little “stick” managed to eliminate the duplicates so that I now have about 24,000 originals preserved forever in a fire-proof vault, a cost-free and independent method of safekeeping.” – Cyril R.
I now have about 24,000 originals preserved forever
“The Photo Stick works just the way it says it does; very easy to use. I checked it when done, and there were my pictures. There is so much room on the stick that I should be able to use it for years to backup documents and pictures.” – Linda W.
Money-Back Guarantee
The manufactures of PhotoStick are very confident about their product that is why they have refund policies in place.
You can return the product to the manufacturer if you receive the one with manufacturing defects. But, see to it that the manufacturer receives it within 30 days of the original shipment date. If the return is reviewed after the 30 day period from the original shipment date, your refund shall not be issued.
RMA Return Form is compulsory with every return. This form includes the order number, the name, email id, correct shipping address. Also, the returns which do not contain this RMA Return Form are not entertained and the refund shall not be issued.
Another important thing to note before returning the product is that it must be in the original packing and all the parts must be included. Any return that is received without the PhotoStick insert card, packaging or the PhotoStick device shall not be entertained and refund is not issued. Thus, make a note that the original packaging must be with you for a period of at least 30 days.
The manufacturer will inspect your product after receiving back. The refund is a credit to the mode of payment that you used earlier to purchase the gadget. You will be given a notice via email for the refund. Wait for 30 days or so for the payment to reflect in your account.
Conclusion
The Photo Stick is a handy tool that anyone can use. As long as you have a USB port on your device, you can plug it right in and begin backing up all your files. If you want affordability, convenience, and security in one tiny gadget, then ThePhotoStick is for you.
It frees up much-needed space in the computer and cloud storage. Plus, backing up photos was never so easy. By Using photostick you do not need to buy any special software and perform a full scan in just a few minutes. You will not have to sort through everything before transferring them to another location.
The photo backup stick does it all.
Have Questions? Read Some FAQ’s
Does ThePhotoStick for Mac & Windows Computers need to install anything on my computer?
No. ThePhotoStick does not need to install anything on your computer, nor does it require anything to be already installed on your computer. ThePhotoStick comes with everything it needs — you simply need to plug it into an available USB slot and it’s ready to run.
The one exception to this is for older computers running Windows 7. If the Windows 7 computer is not up-to-date on the latest hotfixes from Microsoft, you may need to install a newer version of the .Net Framework. You only need to do this, if you get a message saying you need to upgrade your .Net Framework version. For convenience, we include the .Net Framework installer on the ThePhotoStick drive in the directory called “.net_installer_for_win7_computers”.
Can I use ThePhotoStick for Mac & Windows Computers as an ongoing back-up solution?
Yes. Many people leave the ThePhotoStick® plugged in and do a weekly back-up to make sure they are continually protecting their memories.
Can Photostick be used with multiple devices?
Yes, that is one of the better advantages of the Photostick. You can easily backup photos not from one, but from multiple computers if you wish. The setting up is similar for all computers, after the first-time setup on each computer, you can start using the backup feature to scan and save photos from said computers using a single Photostick device.
How long does file backup take?
Now it all depends on how many photos you have on your device that can be saved to Photostick. The scanning and backup happens fairly quickly and does not require a lot of user interference. Depending on the number and the size of files being saved, Photostick can take anywhere from up to 5 minutes to over 20 minutes to fully and securely make the backup you requested.
What photo file size is used when we say the 128GB version can store 60,000 photos?
We use an average photo file size of 2MB for our calculation. We picked this size for our calculation because it is the approximate size of an 8MP photo saved in a .JPEG format. Some file sizes are much larger, such as camera RAW files, movie files such as .MOV and .MPEG4, and photos taken with cameras that can take photos greater than 8MP, so the number of photos that can be stored on ThePhotoStick® can vary.

I'm Tony James and I love gadgets (a little less than I love my WIFE!!) - it's my way of contributing to the gadget world, even though I'm an engineer by profession that from where I earn my bread and butter. I've been an engineer for as long as I can remember and love nothing more than reviewing different products - whether it be smartphones, laptops or even drones! I believe that a product should be able to speak for itself, so I test them exhaustively before writing my reviews. My readers know that when they see a review from me, it's going to be honest, unbiased and worth their time. I also love swimming (especially in the sea) and am a great cook! My two young children keep me busy when I'm not at work or swimming.