Congratulations! You have purchased the new backup device, the most popular and reliable Photo stick to save all your precious memories. Read our Photostick Troubleshooting Guide.
If you are not sure how to use it for the first time or it’s not actually saving your photographs automatically, then this article is for you.
We explain how to optimally use the Photostick and how to troubleshoot the Photostick device too. Let’s get started!
Which kind of files will the Photostick actually find?

This question is asked multiple times. The software on the PhotoStick device is able to find and retrieve jpeg, jpg and gif files from your device. But, having said this, the Photostick device is also capable of storing mpeg4, bmp, .mov, and tiff files. Although, automatically, the device won’t be able to retrieve these extensions, however, manually you can add these kinds of files to the PhotoStick.
Thus, if you are facing the problem of automatic transfer of any of the above mentioned files, then you have got the solution to it and no need to troubleshoot the PhotoStick.
Also, there are no compatibility issues when you transfer these files from one device to another. Follow the complete Photostick Troubleshooting, if you are facing some problem.

How to Run The Photo Stick?
It is fairly easy to run the PhotoStick on your system. It is designed to run on its own. You only need to plug in into your computer’s USB port and it will start on its own. Your computer shall notify you when the device which you plugged is ready to use. You get to answer what you would like to do with it.
It is imperative to know here that each computer might behave in a different way depending on its OS but the process of PhotoStick is self-explanatory.
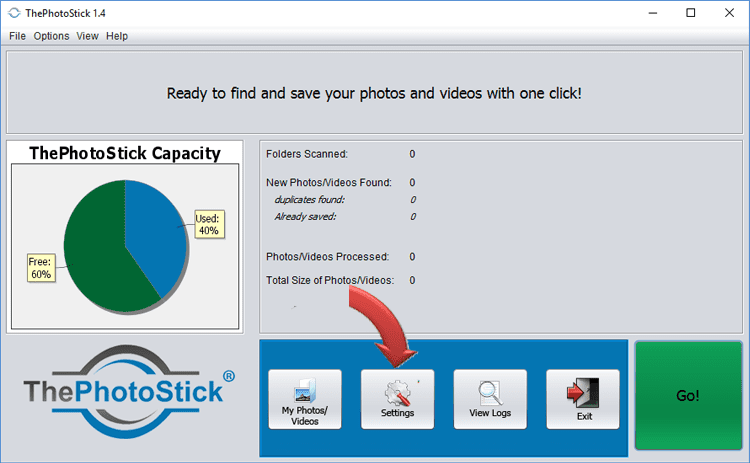
- Main Menu –This menu toolbar helps the user access various photo stick functionality, including device images/videos, resources, settings, and updates.
- State area- This field will inform you of the software’s actual status while a backup or some form of service is running.
- Photo Stick Capacity Chart – This little map will inform you about the space you have used and how much space is left on ThePhotoStick.
- Backup Statistics-All sorts of details concerning the latest backup.
- Button “Photo / Video Organizer“ – This button will open a window with all your videos and images currently backed up.
- “Settings” Button -This opens the application windows for options and settings.
- Button “User Guide” -This will give you the electronic user guide.
- “Exit” icon– This icon will stop the application, as the name implies.
- “Go!” Button-And the essential button, eventually, begin to back up all your pictures and videos on your device.
Does This Photo BackUp Device Install Anything on Your Device?
If you are scared whether PhotoStick will install any unwanted program to your system, then let me pacify by saying that everything that the device needs for operation happens inside the PhotoStick only. No files or apps are needed to operate or use the device.
Photostick is designed in such a way that uses the existing programs on your system. Mostly, it uses the harddisk, it also doesn’t use the internet or any cloud usage. Thus, nothing from outside is required to make this device work; no files to download, no sign up or subscription. More so, there is no hidden cost involved.
Photostick is a completely safe and harmless device and does not put your computer at risk at all. This does not take unnecessary storage and will not introduce malware programs to your computer.
Does The Photo Stick Work with Your Device?
The Photo Stick is designed in such a way that it works well with most of the computers. It works well with PCs, Macs, most of the laptops and other devices that have USB ports. Also, bear in mind that it doesn’t work with iPhones, iPads, smartphones and other Android devices. For these, you require PhotoStick Mobile.
Requirement for your Computer to Run Photo Stick:
- The primary requirement is that your computer needs to have a Windows or Mac OS and a USB drive.
- No internet is required for operation.
- For Mac OS X version 10.7 and above, it works perfectly.
- For Windows it works well with Windows 7, 8, 8.1, 10, XP and Vista.
Also, after you have bought PhotoStick and you face any compatibility issue, you may contact their customer support. The customer support service is very prompt in answering your queries. They also help you with Photostick Troubleshooting and figure out the right issue, you might be facing with PhotoStick.
PhotoStick Troubleshooting
Some of the steps are mentioned below if you are facing any problem with your PhotoStick Photo Backup Device.
How To Reset Photostick To Factory Defaults?
If you wish to restore PhotoStick to factory settings, then you may use the Windows restore tool:
- Download the PhotoStick Restore Tool
- Plug your Photo Backup Stick into your Windows computer
- Run the pbs-restore.exe app and click the “Recover” button.
- If your Photo Backup Stick is not detected, please contact our support team.
If You wish to Manually Restore Factory Setting in PhotoStick, Follow These Steps –
- It will delete any thumbnail files it can find
- Delete the My_Files folder and all subfolders and files located in My_Files
- It deletes the entire ThePhotoStick folder.
Debug logging (Support Only) — There is also an option of Debug Logging, this is used when the Photostick requires to be investigated for an issue. This would be done while you are on call with their customer support team.
Does The Photo Stick Work With Windows?
Yes, it does. Here are the instructions on how to start it up.
- Insert Your Photo Stick inside any open USB slot.
- Find the USB inside File Explorer and open thePhotoStick_Windows.exe.
- When the program loads in, simply click “Go”.
Will the PhotoStick work with Mac?
Of course, there are guidelines below about how to launch it on your Mac.
- Find and insert The PhotoStick into an empty USB port.
- Check for a PHOTOSTICK name icon on your screen (if the icon does not show at all, you can go to the Finder and open it from the System List)
Conclusion
Thus, we have shared the best way to use the Photo Stick and also how to troubleshoot it. If you still have doubts, you can write down to us in the comments section below and we shall be happy to help you. Photostick Troubleshooting is a concern for many readers.

I'm Tony James and I love gadgets (a little less than I love my WIFE!!) - it's my way of contributing to the gadget world, even though I'm an engineer by profession that from where I earn my bread and butter. I've been an engineer for as long as I can remember and love nothing more than reviewing different products - whether it be smartphones, laptops or even drones! I believe that a product should be able to speak for itself, so I test them exhaustively before writing my reviews. My readers know that when they see a review from me, it's going to be honest, unbiased and worth their time. I also love swimming (especially in the sea) and am a great cook! My two young children keep me busy when I'm not at work or swimming.